Listbox bir çok seçeneği barındıran bir objedir.Amac listbox tan kulllanıcıcnın istediği secenege göre programa islev kazandırmaktır. Örnek olarak biz burda kolay bir örnek olması bakımından meslegimizi ekrana yazacak bir uygulama yapalım Figur yüzeyimize 1 tane listbox ve 2 tane statick text yerlestirin ve etiketi text1 olan static textin stringini ‘MESLEGINIZ’ olarak degistirin. text2 olanı ise bos bırakın. Listbox a secenek girisi yapmak için,list box üzerine cift tıklayın ve özellikler menusunu acın. Asağıdaki şekilde görülen seçenek ekleme düğmesine basın.
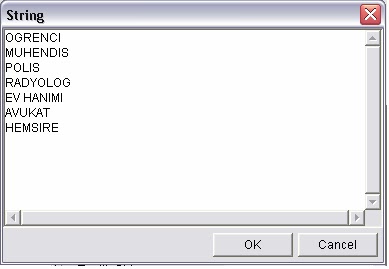
Karşınıza çıkan kücük pencerede listbox yazan satırı silin ve aşağıdaki gibi seçenekleri ekleyin.
Bu islemlerden sonra OK dügmesine basarak özellikler penceresinide kapatın. Eklediğimiz seceneklerden Ögrenci olan secenek için listbox 1 degerini alır,muhendis için 2,polis için 3 degerlerini alarak ilerler.Bu nokta kodlamalar için önemlidir. Figur yüzeyimiz asagıdaki gibi olacaktır.
Bu işlemlerden sonra figurumuzu listbox.fig olarak kaydedin. Karşınıza çıkacak olan m-function
dosyasını aşağıdaki gibi kodlayın.
function varargout = listbox(varargin)
% LISTBOX Application M-file for listbox.fig
% FIG = LISTBOX launch listbox GUI.
% LISTBOX('callback_name', ...) invoke the named callback.
if nargin == 0 % LAUNCH GUI
fig = openfig(mfilename,'reuse');
% Use system color scheme for figure:
set(fig,'Color',get(0,'defaultUicontrolBackgroundColor'));
% Generate a structure of handles to pass to callbacks, and store it.
handles = guihandles(fig);
guidata(fig, handles);
if nargout > 0
varargout{1} = fig;
end
elseif ischar(varargin{1}) % INVOKE NAMED SUBFUNCTION OR CALLBACK
try
[varargout{1:nargout}] = feval(varargin{:}); % FEVAL switchyard
catch
disp(lasterr);
end
end

end
%| ABOUT CALLBACKS:
%| GUIDE automatically appends subfunction prototypes to this file, and
%| sets objects' callback properties to call them through the FEVAL
%| switchyard above. This comment describes that mechanism.
%|
%| Each callback subfunction declaration has the following form:
%| (H, EVENTDATA, HANDLES, VARARGIN)
%|
%| The subfunction name is composed using the object's Tag and the
%| callback type separated by '_', e.g. 'slider2_Callback',
%| 'figure1_CloseRequestFcn', 'axis1_ButtondownFcn'.
%|
%| H is the callback object's handle (obtained using GCBO).
%|
%| EVENTDATA is empty, but reserved for future use.
%|
%| HANDLES is a structure containing handles of components in GUI using
%| tags as fieldnames, e.g. handles.figure1, handles.slider2. This
%| structure is created at GUI startup using GUIHANDLES and stored in
%| the figure's application data using GUIDATA. A copy of the structure
%| is passed to each callback. You can store additional information in
%| this structure at GUI startup, and you can change the structure
%| during callbacks. Call guidata(h, handles) after changing your
%| copy to replace the stored original so that subsequent callbacks see
%| the updates. Type "help guihandles" and "help guidata" for more
%| information.
%|
%| VARARGIN contains any extra arguments you have passed to the
%| callback. Specify the extra arguments by editing the callback
%| property in the inspector. By default, GUIDE sets the property to:
%| ('', gcbo, [], guidata(gcbo))
%| Add any extra arguments after the last argument, before the final
%| closing parenthesis.

% --------------------------------------------------------------------
function varargout = listbox1_Callback(h, eventdata, handles, varargin)
% Stub for Callback of the uicontrol handles.listbox1.
global sec
sec=get(gcbo,'value')
x1=findobj(gcbf,'Tag','text2');
switch(sec)
case 1,
set(x1,'string','OGRENCI')
case 2,
set(x1,'string','MUHENDIS')
case 3,
set(x1,'string','POLIS')
case 4,
set(x1,'string','RADYOLOG')
case 5,
set(x1,'string','EV HANIMI')
case 6,
set(x1,'string','AVUKAT')
case 7,
set(x1,'string','HEMSIRE')
end


