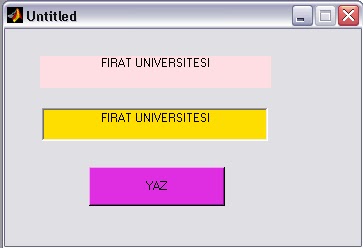
Edit text son kullanıcının bilgi girisi yapacagı giris kutusu olarak düsünülebilir. Fakat programcının bilmesi gereken en önemli nokta edit texte girilen bütün girislerin karakter tipi olarak algılanacagıdır. Örnegin giris olarak 1000 sayısı olarak girip bunu bu sekilde matematiksel islemlere sokamazsınız. Bunun için kodlamada girilen karakter bilgisini numerik forma cevirmeniz gerekir.Aynı sekilde numerik bir çıkışı göstermek istiyorsanız bu numerik çıkışı karaktere cevirmelisiniz. Buradaki örnegimizde okudugumuz okulu veya mezunlar için mezun oldukları okulu giris kabul edip çıkış ekranında bunu yazdıracak basit bir uygulama yapacagız Figur penceresine 1 static text, 1 edit text ve birde push buton ekleyin ve asagıda görülen şekle getirin.
Şekilde pembe olan static text sarı olansa girisi yapacagımız edit text mor olan ise push buton dur.
Bu şekle getirdikten sonra edit.fig olarak kaydedin ve acılan m-functon dosyasını aşağıdaki gibi kodlayın.
Şekilde pembe olan static text sarı olansa girisi yapacagımız edit text mor olan ise push buton dur.
Bu şekle getirdikten sonra edit.fig olarak kaydedin ve acılan m-functon dosyasını aşağıdaki gibi kodlayın.
function varargout = edit(varargin)
% EDIT Application M-file for edit.fig
% FIG = EDIT launch edit GUI.
% EDIT('callback_name', ...) invoke the named callback.
if nargin == 0 % LAUNCH GUI
fig = openfig(mfilename,'reuse');
% Use system color scheme for figure:
set(fig,'Color',get(0,'defaultUicontrolBackgroundColor'));
% Generate a structure of handles to pass to callbacks, and store it.
handles = guihandles(fig);
guidata(fig, handles);
if nargout > 0
varargout{1} = fig;
end
elseif ischar(varargin{1}) % INVOKE NAMED SUBFUNCTION OR CALLBACK
try
[varargout{1:nargout}] = feval(varargin{:}); % FEVAL switchyard
catch
disp(lasterr);
end
end

%| ABOUT CALLBACKS:
%| GUIDE automatically appends subfunction prototypes to this file, and
%| sets objects' callback properties to call them through the FEVAL
%| switchyard above. This comment describes that mechanism.
%|
%| Each callback subfunction declaration has the following form:
%| (H, EVENTDATA, HANDLES, VARARGIN)
%|
%| The subfunction name is composed using the object's Tag and the
%| callback type separated by '_', e.g. 'slider2_Callback',
%| 'figure1_CloseRequestFcn', 'axis1_ButtondownFcn'.
%|
%| H is the callback object's handle (obtained using GCBO).
%|
%| EVENTDATA is empty, but reserved for future use.
%|
%| HANDLES is a structure containing handles of components in GUI using
%| tags as fieldnames, e.g. handles.figure1, handles.slider2. This
%| structure is created at GUI startup using GUIHANDLES and stored in
%| the figure's application data using GUIDATA. A copy of the structure
%| is passed to each callback. You can store additional information in
%| this structure at GUI startup, and you can change the structure
%| during callbacks. Call guidata(h, handles) after changing your
%| copy to replace the stored original so that subsequent callbacks see
%| the updates. Type "help guihandles" and "help guidata" for more
%| information.
%|
%| VARARGIN contains any extra arguments you have passed to the
%| callback. Specify the extra arguments by editing the callback
%| property in the inspector. By default, GUIDE sets the property to:
%| ('', gcbo, [], guidata(gcbo))
%| Add any extra arguments after the last argument, before the final
%| closing parenthesis.

% --------------------------------------------------------------------
function varargout = edit1_Callback(h, eventdata, handles, varargin)
% Stub for Callback of the uicontrol handles.edit1.
% --------------------------------------------------------------------
function varargout = pushbutton1_Callback(h, eventdata, handles, varargin)
% Stub for Callback of the uicontrol handles.pushbutton1.
a=findobj(gcbf,'TAG','edit1'); %etiketi edit1 olan nesneyi bul a ya ata
b=findobj(gcbf,'TAG','text1'); %etiketi text1 olan nesneyi bul b ye ata
yazi=get(a,'string') %a nın belirtiği nesnenin stringini yazi değikenin ata
set(b,'string',yazi) %yazi ile belirtilen stringi b nesnesinin stringine ata

